Import Windows Live Mail to Office 365 – Direct or 3 Stages Method


Summary: Here, you will learn the methods to import Windows Live Mail to Office 365 in two ways. One is the direct method, other one has three stages to it. Learn each method and choose the better to apply. Stick to the blog to get all the information on these solutions.
Office 365 is an entire suite providing various different applications for different purposes. All the data is stored on cloud wan offered are the features to keep the data safe and secure and backup options.
Since the use of cloud-based email services has been growing, various users want to switch to one of the most popular services i.e. Office 365.
To migrate Windows Live Mail to Outlook 365, users can use the methods as described in this detailed guide. But before that, let’s take a look at the benefits of switching to Office 365:
- Storing all the information on cloud reduces the chance of corruption.
- You can get access to your data from any location at any time of the day.
- Latest technology updates are provided in the subscription plans of Office 365.
Other than these, Office 365 provides a huge storage space i.e. up to 1 terabyte which is more than sufficient. Now, towards the methods of moving the data.
Method 1 – How to Import Windows Live Mail to Office 365 Directly?
This method is the only shot at directly moving all the data like emails, contacts, and calendars to Office 365 account. Download the Windows Live Mail Converter which allows users to export the files in bulk easily.
This software keeps the inline images and hyper-links maintained even after converting it to supported file format. There is an option to Split PST file by size during the migration procedure. Also, several naming convention options are offered to the users during the conversion task.
Let’s take a look at the steps to perform this operation.
Migrate Windows Live Mail to Outlook 365 Using the Software
Following are the steps to move the data:
1. Download the software on your Windows OS machine and click on the Open button to add the files to the panel.

2. Click on the Browse for the Storage Location option and browse for the files. Choose the files and hit the Add File option.

3. Choose the Export Selected button and hit the Advance Settings option and apply the required filters.

4. After that, enter the User Name and click on the Validate button. Mark the Maintain Folder Hierarchy and Don’t Export Empty Folder options to import Windows Live Mail to Office 365.

5. Here, you have to apply the options like Maintain Folder Hierarchy option and click on the Export button.

Following options are provided in the Advanced Settings feature:
- User Impersonation: Enter the Admin SMTP and the password to move the data with impersonation.
- Date-Range Filter: To select a time-zone by setting dates from and to for selective data exportation.
- Categories: Select the items to be move from the mailbox.
Note: You can choose to export the data without user impersonation if so required. Choose the option Migration to Office 365 Without Impersonation to avoid this option.
Method 2 – Manually Migrate Windows Live Mail to Outlook 365
The manual solution for this task is quite lengthy since there are three stages to this method as described here:
We will be mentioning the steps of all the three stages in the upcoming sections. Keep up with the steps to understand how this method works and what are the limitations that are encountered by the users.
Let’s get going to these stages.
Stage 1 – Import Windows Live Mail to Office 365 Via Conversion
- Launch the WLM application and click on the Export option.
- Choose the Export Messages option and select the Exchange Server button.
- Hit Next and press Yes when the confirmation tab appears.
- Now, choose the EML data folder and hit OK to complete the procedure.
Once the conversion process is completed, we will perform the method to retrieve the PST file.
Stage 2 – Export Outlook Date File from MS Outlook Application
Follow the givens steps:
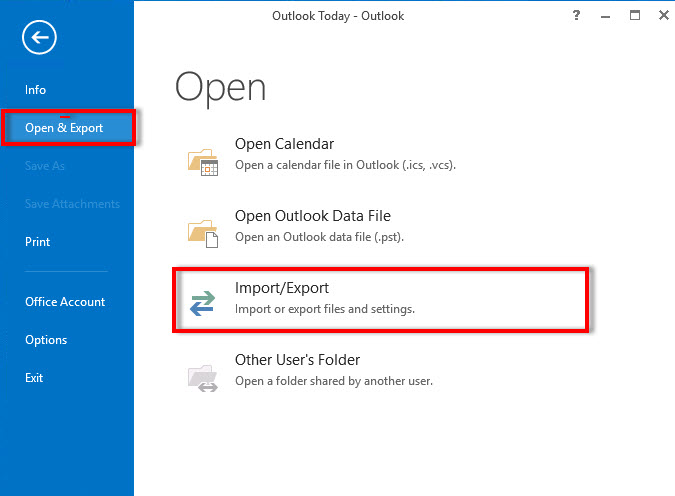
1. Open MS Outlook and click on the File tab. Click on the Open option.
2. Start the process to migrate Windows Live Mail to Outlook 365 by selecting the Import/Export option from there.
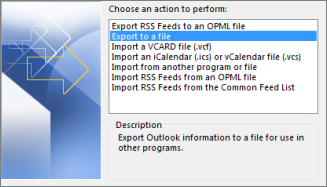
3. Choose the Export to a file option and hit Next to move further.
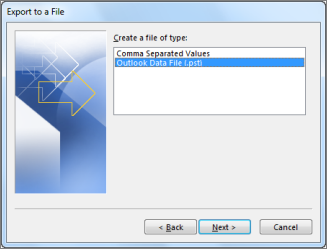
4. Select the Outlook Data File (.pst) option in the next window and press the Next option.
5. Here, you have to choose the mail folder you want to export and hit Next.
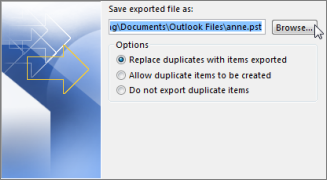
6. Hit the Browse button to select a destination location and press Finish to complete the task.
Now that you have create the Outlook data file, you have to just import it to the Office 365 account. For that, you can check the next section.
Stage 3 – Completely Import Windows Live Mail to Office 365 by Importing Converted File
For this procedure, we will be making use of the Network Upload method where users need to configure Azure AzCopy tool. You will need to make a copy of the SAS URL which is the combination of network URL for Azure storage path in the OWA. Now, check the steps to perform this task:
- First, go to the Exchange Admin Center via the admin portal and click on the Permissions option.
- Now, in the admin roles, click on the Organization Management role.
- Choose the Mailbox Import Export role and hit Save.
After doing so, it will take 24 hours to completely migrate Windows Live Mail to Outlook 365.
There are some limitations of this method as described below:
- This is a time-consuming method since it takes 24 hours to complete the import.
- Becomes a lengthy process because it has 3 stages to it.
- There is no guarantee of data integrity being kept intact.
- Folder hierarchy is not always maintained and risk of data loss due to the technicality in the third stage.
Wrapping Up
Due to the high-level protection and security measures and backup features offered by the cloud platforms, users are switching to it by the day. This is why the process to import Windows Live Mail to Office 365 for WLM users should be easier and quicker.
The manual method, having 3 stages to it, is not as suitable for users since it is a complicated and lengthy method. Whereas, the tool for the same is a much preferable choice of the experts and professionals that allows a smooth migration task.