Learn How to Export Office 365 Mailbox to PST Using Top 4 Solutions


Summary: If you are looking out a way to export Office 365 mailbox to PST files? Then read this guide to understand four possible ways to perform this task. Here, we will explain the step-by-step solutions with one smart solution as well for the export process with screenshots.
However, before getting into the solution, it’s important to know about the reasons behind this operation in Office 365.
Table of Contents:
Why do Organizations Need To Export their Office 365 Mailbox?
Saving a local copy of mailbox data on your system to overcome any disaster or unfavorable situation is the first choice of all administrators. You will have a backup copy by exporting Office 365 mailbox(es) to PST. Later these files can be easily imported if necessary.
Additionally, the exported PST file from the Office 365 account can be used to share the data between Office 365 accounts. The destination user can import PST directly to Office 365 whenever needed.
4 Methods to Export Office 365 Data files to PST
- Method 1. Secure way to Export Office 365 to PST (Recommended)
- Method 2. Using eDiscovery Tool from Office 365 Portal
- Method 3. Export O365 Mailbox to PST via Import/Export
- Method 4. Office 365 to PST via PowerShell Commands
There are generally 2 ways that can be used to perform this task, but in this guide, we are going to cover the top 4 ways to execute the same. Let’s start with the most reliable way of using a professional software solution.
Method 1. Export Office 365 to PST Using A Reliable & Secure Tool
If you are looking for a quick and trusted solution, then you are recommended to use Office 365 eDiscovery Export tool. There are a huge number of applications available in the market that can help you guys in the same. But choosing the best one among the rest for guaranteed results is the toughest part.
Thus, here we have suggested one trustworthy utility that a user can follow to do the same. This is the most preferred choice of users. So, you can try it without any doubt with no risk of data loss. It enables you to export data from Office 365 mailbox to PST format in just a few simple clicks. Moreover, the application is well-suited for Windows users with no limitations.
Wants to Perform Bulk Migration Operation in an Organization?
This is the application that overcomes all the flaws of manual solutions and fits well in every possible situation. This application does not require any administrative rights to export Office 365 mailboxes into PST files.
Both admin and users can use this application without any dependency or restriction. Moreover, whenever there is a requirement to save mailboxes in bulk, then this tool provides the option for the same.
How Does This Software Export Office 365 Mailbox to PST Directly?
- Step 1- Firstly, provide Source Platform as Office 365 and Destination as Outlook.

- Step 2- Now, select the category from the workload selection that you want to export from Office 365 to Outlook file format.

- Step 3- Afterthat apply Date-Range Filter. With this, you can perform a date-based selective export. Then click next.

- Step 4- Now provide the Office 365 Email ID and Application ID and then Validate some permissions.

- Step 5- Now enter the backup folder path and set the destination where you want to save your PST files.

- Step 6- Now, there are multiple ways to add users from the source account
Import Users: Through this users will import via CSV
Fetch Users: This will fetch users automatically from the source domain
Download Template: This feature will download the template.
- Step 7- Now you will find Show Selected toggle which allows you to view the list of selected users. You can also search for a specific mailbox and pick the user to export data.

- Step 8- Finally, click on Start Export to export mailbox from Office 365 to PST file.

After performing all the above steps, you will successfully export your Office 365 data.
Method 2. Export PST File From Office 365 Account Using eDiscovery
eDiscovery by Microsoft is designed to identify and deliver electronic data. This is further helpful in legal cases as pieces of evidence. One can try this eDiscovery in O365 to search data in the mailboxes, O365 Groups, SharePoint Online, Skype for Business Conversations, Microsoft Teams, and OneDrive for Business sites. All this searching can be done in the same eDiscovery search via the Content Search tool.
However, it is originally meant for searching the O365 content for evidence and exporting the search results to PST format for legal purposes.
Thus, it is known as an In-Place eDiscovery search for a PST file. It cannot be termed as the sole method to export Office 365 Mailbox to PST format method as it was not the intention behind the method.
Export Search Results of eDiscovery Method
Here is the stepwise procedure for exporting search results of eDiscovery cases, just follow the steps mentioned below. But before we go into that:
Warnings, you must keep in mind.
- Admin permissions are necessary for a user to have an eDiscovery feature for Exporting Office 365 Mailbox to PST.
- Your account must be a member of the Discovery Management Role Group.
- Unsupported Browser Alert: If Microsoft Edge or Internet Explorer is not used while downloading the search result, it will generate the error: “Application cannot be started. Contact the application vendor”
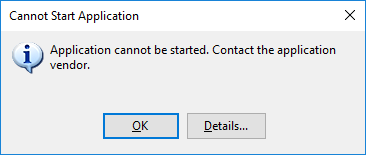
- Supported browser: Internet Explorer 8 or above version/ Mozilla Firefox/ Google Chrome with installed ClickOnce add-in.
- You cannot perform specific folder searches but can export only via date range.
- A user must have 32-bit & 64-bit versions of Windows 7 or above version.
- Microsoft .NET Framework 4.7.
The steps to Export PST Files from Office 365 Admin Center
A user needs to follow the below-mentioned workflow to use eDiscovery in the Security & Compliance Center to start the process:
Step 1. Grant appropriate eDiscovery permissions to users
Following are the role groups related to eDiscovery in the Security & Compliance Center:
- Reviewer: It is the most restrictive permission related to eDiscovery cases. The main motive of this role group is to let members have a look and access the case data in O365 Advanced Discover.
- eDiscovery Manager: In this role group members are allowed to create and manage eDiscovery cases. In addition, they are also allowed to manage the eDiscovery cases, which are created by them or a member of.
- eDiscovery Administrator: Apart from all case management tasks that an eDiscovery Manager can do, many other tasks are also done. For example, the eDiscovery Administrator can view all cases that are listed on eDiscovery pages, manage all cases, and access case data in Advanced eDiscovery for an organization.
After this, you know clearly what roles need to be assigned before using eDiscovery. Now, it’s time to know how these permissions are assigned. Follow the steps below:
- First, you need to go to https://protection.office.com.
- Log in to your Office 365 account and move to the Security & Compliance Center
- Then, click on Permissions >> eDiscovery Manager >> Edit role group.
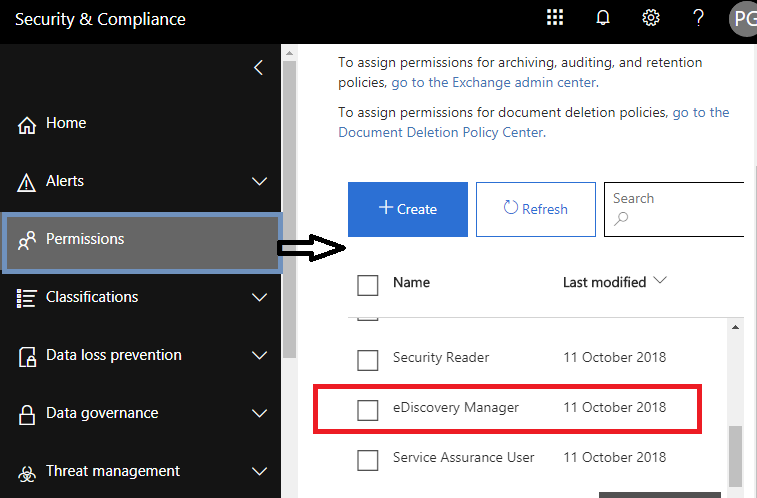
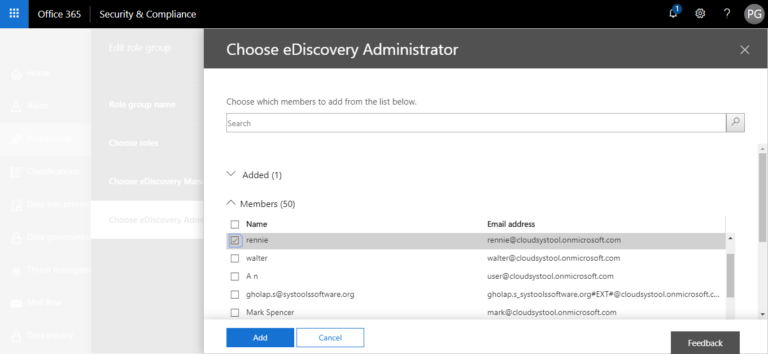
- Click on the Choose eDiscovery Administrator >> Edit >> + (Add icon).
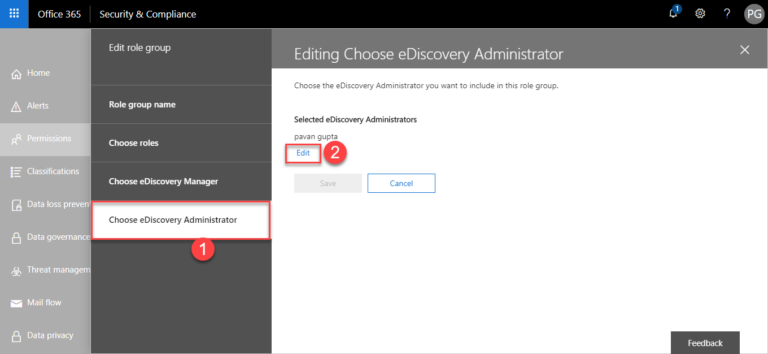
- Click on the + (Add icon) to add the user as an eDiscovery Manager.
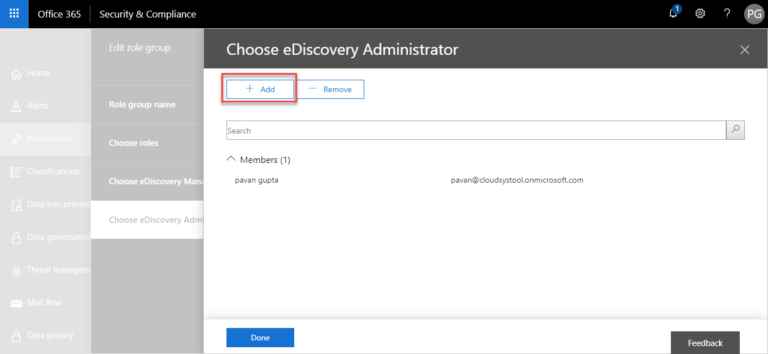
- Choose the user that you want to add as a member and click on Add button.
Note: Here, Rennie is added as a member. Unless you add a user as a member, the eDiscovery feature is unavailable to the user mailbox to perform an eDiscovery search & Export Office 365 Mailbox to PST.
Step 2. Create & Customize Search
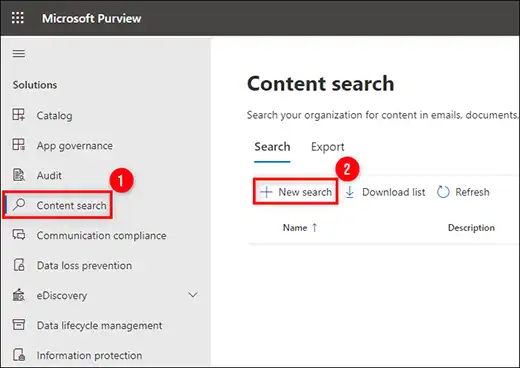
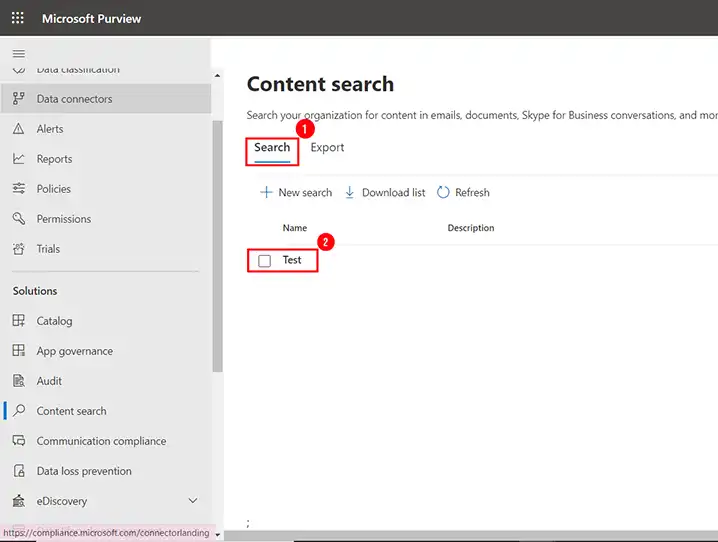
- Move to the More Resources tab and click it. Now a resource panel will open and navigate to Microsoft Purview Compliance Portal and open it. Then, move to the Content Search and click on the New Search.
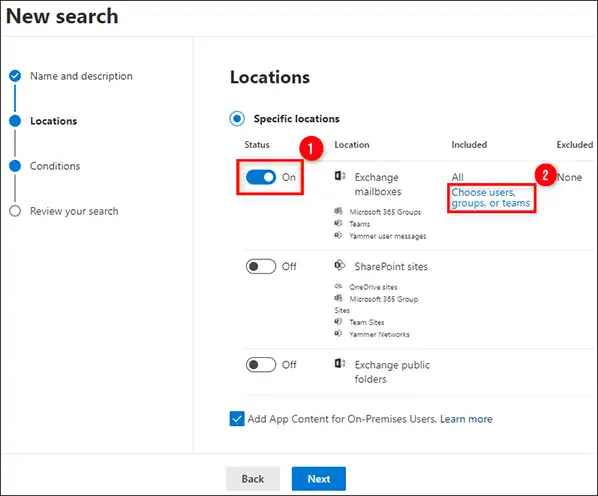
- A new wizard will open with all search customization options in it. Assign a name for the eDiscovery search and select the required location, using which it will export data. Similarly, provide all the desired and essential details.
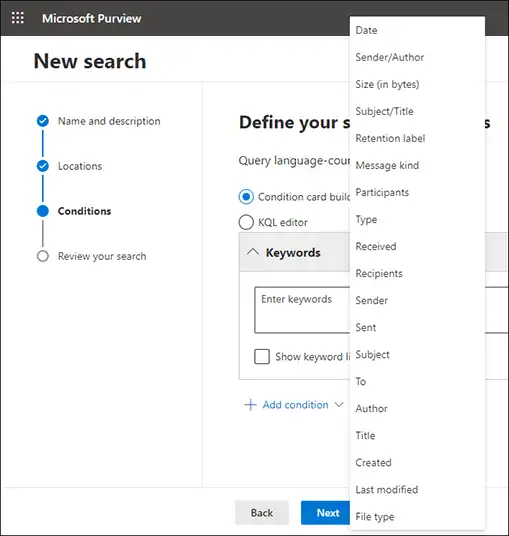
- You can also add different filters to your search and to do so, you can move to the Condition tab and you can apply those filters respectively which include language/region, and keywords/phrases, message fields & properties.
- After all the required settings and filters, now you can click on Submit & Done to initiate the eDiscovery export process.
- If you want to check the status of the process then you can check it by clicking the Search tab.
Step 3. Download Search Results
- When the eDiscovery search process gets completed then click on the Action button. Navigate to Export Results and click on it.
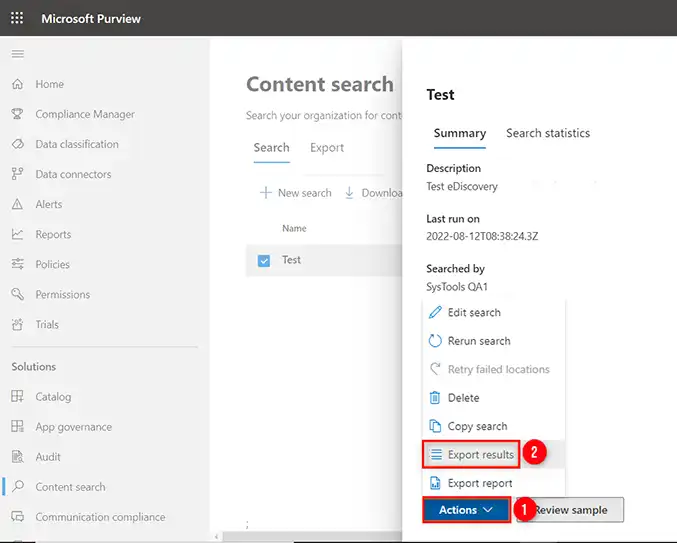
- Now if you want to apply settings such as; exporting encrypted files, etc. then enable it from the given check box option or ignore these settings if you want entire mailbox data to be exported into PST.
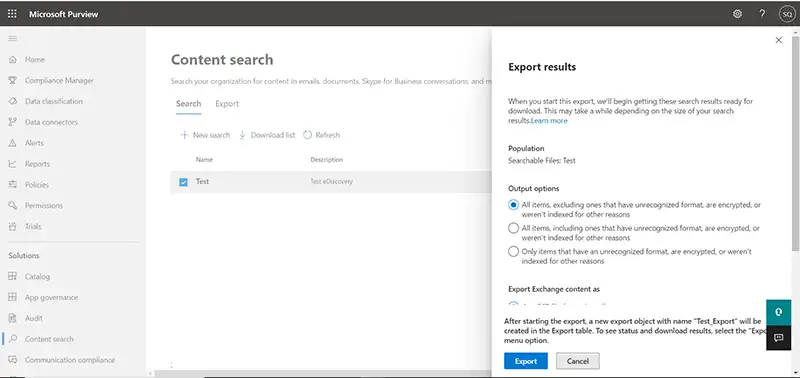
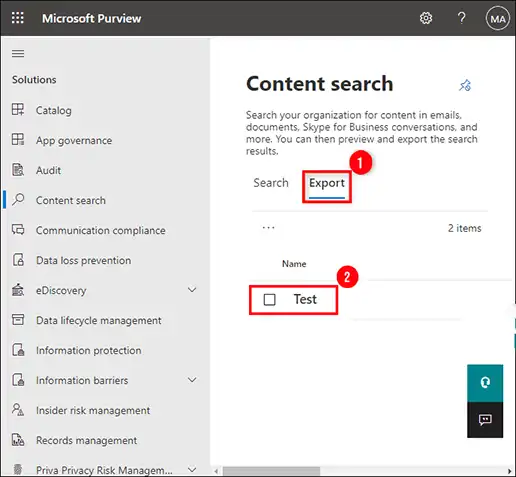
- Once all the required settings are applied then you need to click on the Export button. It will immediately start the process of eDiscovery. You can see the status, navigate to the Export tab, and click on your Search again.
Step 4. Export Downloaded Data into PST File
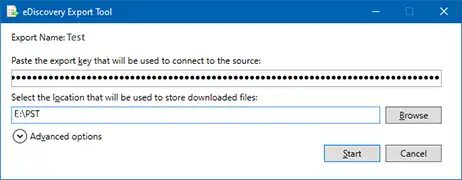
- You can Download the Results once the process of export is completed. You also need to copy the Export Key from the export panel. Which will be used later in the coming step.
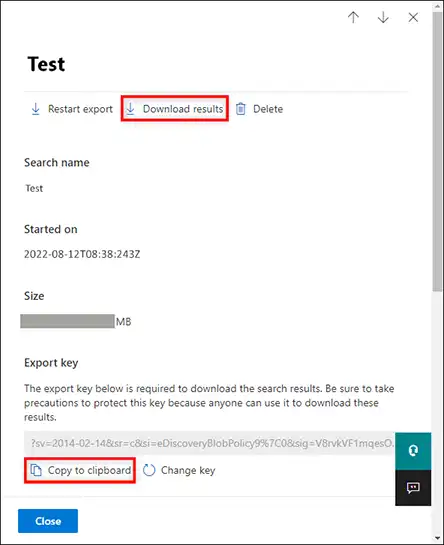
- When you hit the Download Results button, a new wizard will open by the name eDiscovery PST Export Tool. Paste the copied Key and define the path and destination location to save the Office 365 PST files on your computer.
After following this long and complex procedure with so many conditions, your Office 365 data is exported successfully to PST format at the desired location.
Method 3. Export PST File From Office 365 Account via Import/Export
The eDiscovery tool as mentioned above was not intended to export Office 365 mailboxes to PST format. It performs searches for legal purposes and exports the result in PST format as a piece of evidence.
Thus, it is not a reliable approach and suggested approach!
OK, I know what you guys are thinking.
Here is another way of doing the same. Configure your O365 account in Outlook and then use the Export to a .pst file option. This will help users download mailbox data in PST format.
To do the same with the proper set of instructions, follow the steps given below.
- First, you need to configure your Office 365 account in Outlook 2016 or other versions
- After this, your Outlook will sync automatically with Office 365 mailboxes and all data is visible in Outlook now.
- Now, in your Outlook application, go to the File tab.
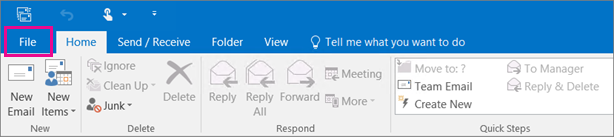
- Then, click on Open & Export >> Import/ Export option.
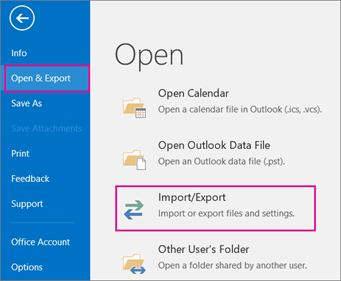
- Here, you need to choose Export to a file >> Next.
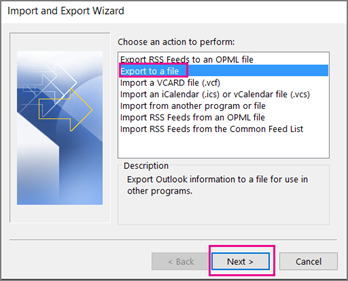
- Choose the email account that you want to export.

- Browse the location to save the output file.
- At last, click on the Finish button.
Looks like an easy way of doing so.
But wait! There is more to the story
Microsoft itself mentioned in the blogs that it can be used to export a single Office 365 mailbox to PST at once. From the admin point of view where he/she has multiple mailboxes, this is not at all a feasible approach.
Apart from this, this export process does not move all data like it leaves meta properties. So, there might be a loss of some data.
Thus, you need to look for some other alternative to save Outlook Web App Emails to Computer.
Method 4. Export Office 365 to PST via PowerShell Commands
Various users export Office 365 mailboxes to PST format via PowerShell commands. However, unable to perform this task in a perfect way as the commands become confusing sometimes.
Don’t know how it can be done properly? Wait! Let me show you how you can do it!
Steps to Export Office 365 mailbox to PST File via PowerShell
Let’s start here with an example:
Now, you have to consider
- rennie@cloudsystool.onmicrosoft.com: The mailbox that needs to be exported.
- mia@cloudsystool.onmicrosoft.com: Newly created account in Outlook.
- pavan@cloudsystool.onmicrosoft.com: Account with all administrative rights.
Step 1. Grant appropriate eDiscovery permissions to Users
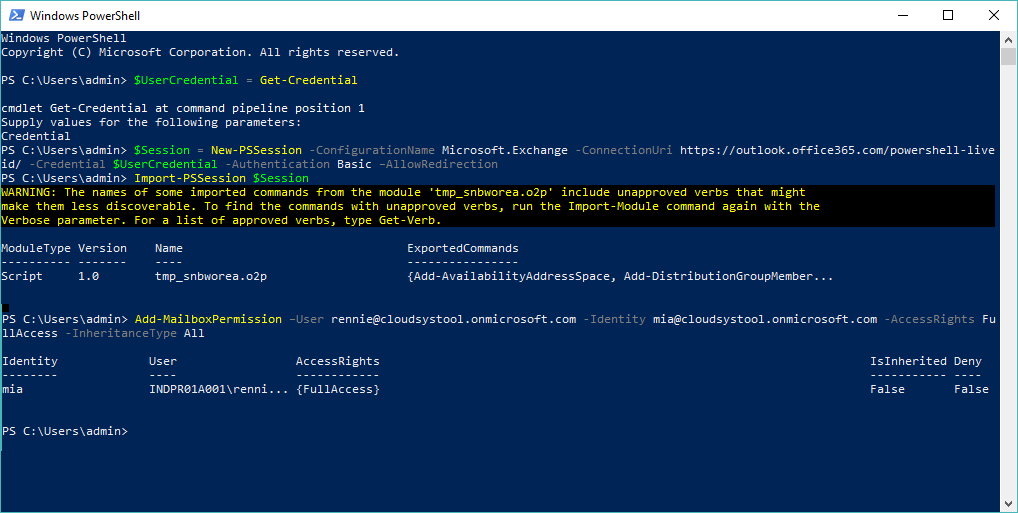
1. Execute the command given below:
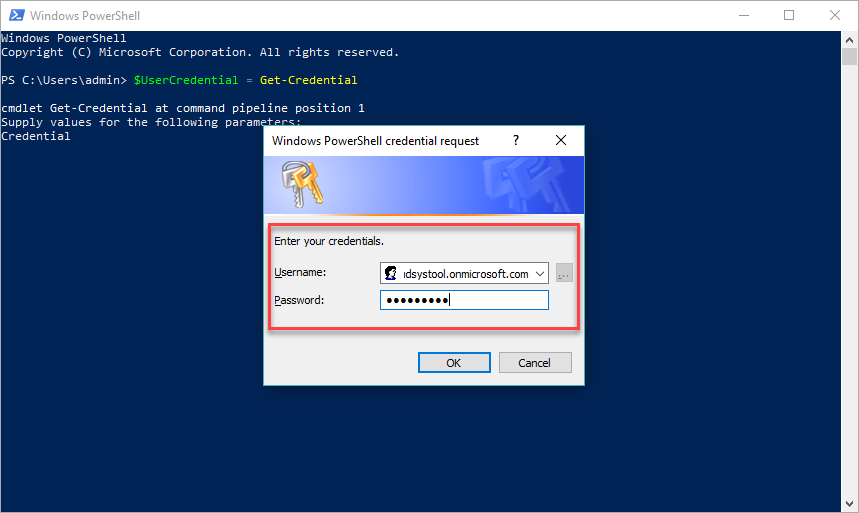
“$UserCredential = Get-Credential”
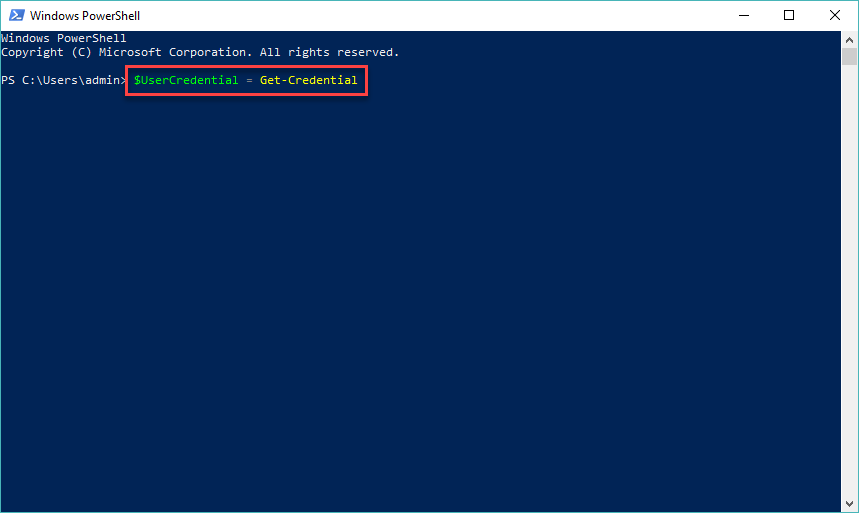
2. Enter the login credentials of your admin account i.e.,
pavan@cloudsystool.onmicrosoft.com
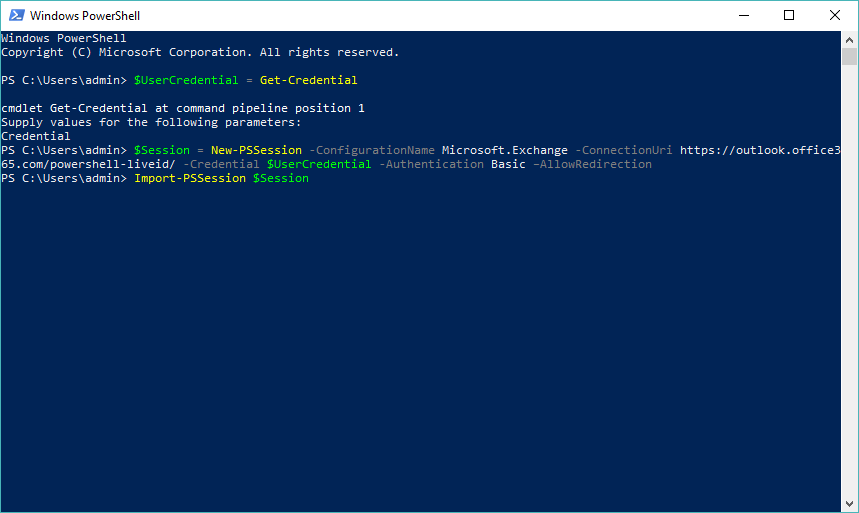
3. Run the below-mentioned command:
“$Session = New-PSSession -ConfigurationName Microsoft.Exchange
-ConnectionUri https://outlook.office365.com/powershell-liveid/
-Credential $UserCredential -Authentication Basic –AllowRedirection

4. Then, execute the following command:
Import-PSSession $Session
Step 2. Grant Mailbox Access Right
Here, rennie@cloudsystool.onmicrosoft.com will get complete access to the mia@cloudsystool.onmicrosoft.com mailbox by running the below command:
Add-MailboxPermission –User rennie@cloudsystool.onmicrosoft.com
-Identity mia@cloudsystool.onmicrosoft.com -AccessRights FullAccess
-InheritanceType All
Step 3. Open the Outlook application via the newly created account
Now, after assigning access rights, it is important to make sure that both accounts are there in the left pane of the Outlook window.
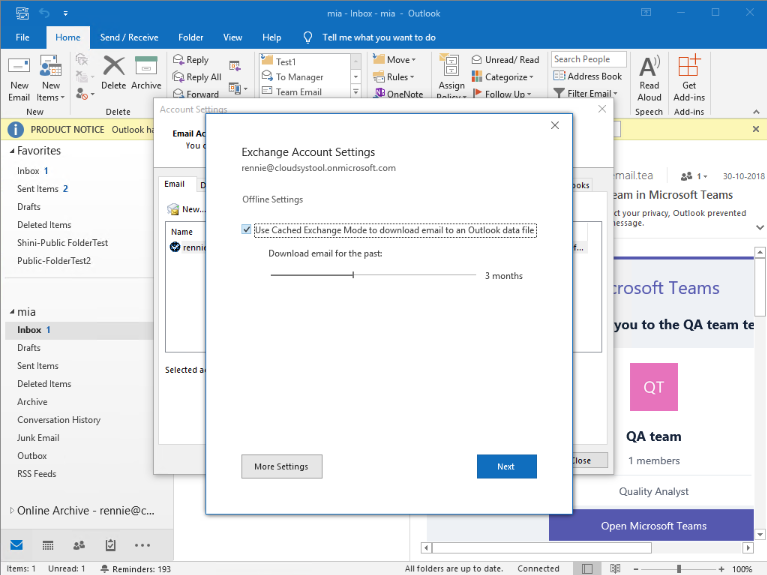
Step 4. Check the Configuration Settings of Outlook
You need to make sure that Outlook is ready to get configured and download emails by following the steps mentioned below:
- Click on File -> Info -> Account Settings option

- Go to the Account Settings option and select the account of your choice
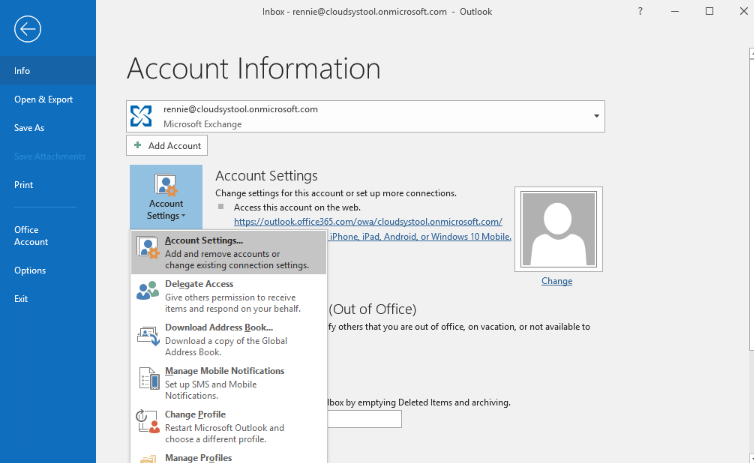
- Click the Change button and verify whether the Use Cached Exchange Mode option is checked or not.
Step 5. Export Office 365 Mailbox to PST Format
When all is set to go, you can take the help of the Import/Export feature of Outlook to extract Office 365 emails to PST format. To know how it can be done perfectly, follow the steps mentioned in method 2 above.
Now, you must be thinking, it is the most perfect way to export multiple Office 365 mailboxes to PST format.
No! (Not Exactly)
Don’t think so as it has some flaws that make you look for some other way. The method discussed requires administrative rights and admin account access. It means you are not allowed to perform this task at the user level.
Apart from all this, if a user is not that technically strong, then also it is not at all a feasible approach to saving Office 365 emails to a desktop. Small mistakes in commands can affect the complete process badly.
Must Read: How to Export Distribution Group Members Office 365?
Conclusion
Whenever users try to export Office 365 mailbox to PST format for any reason, choosing the best method is a tough task for them. Yes! There are indeed some manual approaches that one can try. But nothing is free from some or other limitations. Thus, moving towards a professional solution is not at all a bad choice have one solution for all cases.